Posts

Showing posts from 2012

PART2 - DB2 restore/recover online backup on different server

Image
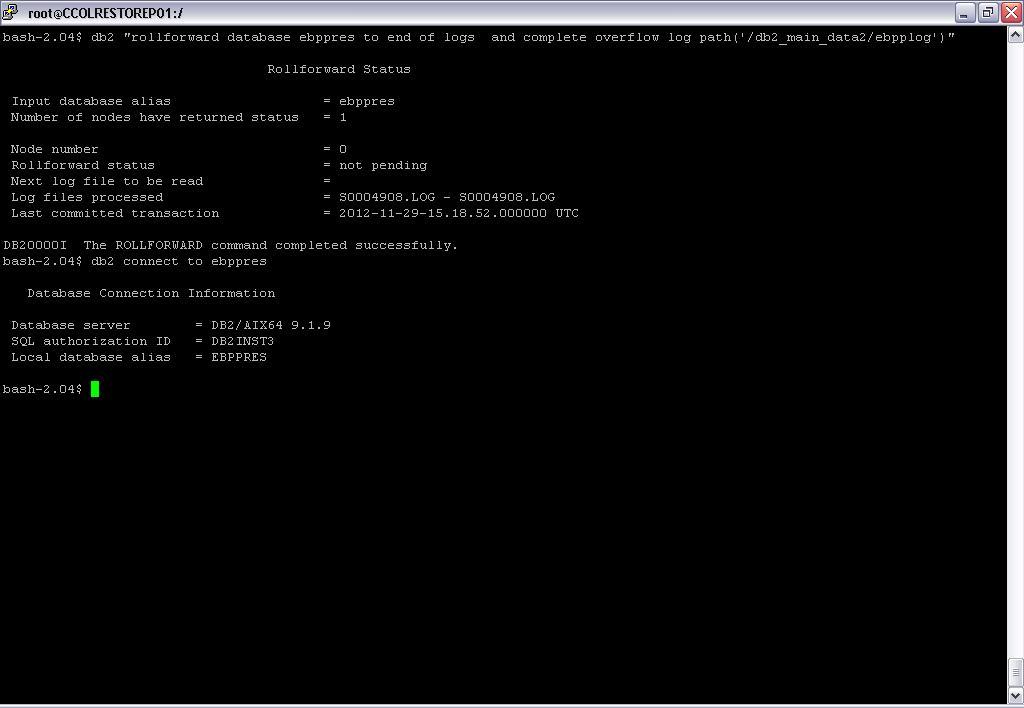
In the previous part 1   we restored the database to different server. Now we will do the recovery of this database. Below is the command used for roll forwarding the database we restored in the part 1. This will put the database on consistent state using the logs that were included with the backup file from original host db2 “rollforward database ebppres to end of logs and complete overflow log path (‘/db2_main_data2/ebpplog’)”  “end of logs” – This indicates that we are doing a full recovery instead of Point in time recovery. If point in time recovery is needed “using local time” clause need to be used also specifying the time which the recovery will end. “complete” – This will stop the roll forward process and undo any uncompleted transactions to put the database on consistent(accessible) state. Here the use of “and” is to combine two commands. As an example above single command is same as issuing below two commands. db2 “rollforward database ebppres to end of log”

PART1 - DB2 restore/recover online backup on different server

Image
DB2 restore/recover database to different server Db2 version - DB2 v9.1.0.10 LUW, no DPF OS – AIX 5.3 Below  is the part 1 of 2 which descibes the process of restoring db2 full online database backup to different server with different mount point definition. So this will be a redirected restore with redefining database containers. BackupProcess Database name – ebpp db2 “backup database ebpp online to /rsair_dbbackup/bifinst1_backup/EBPP compress include logs”; LST -01 Restore Process  Assuming same instance level as the backup host is there on the restoration host, Step 1 – Initiate a redirect restore start Below is the command used.. Explanation follows, db2 terminate db2 "restore database ebpp dbpath on '/db2_main_temp1' into ebppres logtarget '/db2_main_data2/ebpplog' redirect" LST -02 dbpath will be the database path for newly created database. *** This need to be run from the directory which the ba

DB2 – Behavior when users are dropped from OS level

Image
This is to discuss the behavior of db2 when users (Who are granted database authorities) are dropped from OS level. Check the current users and their authorities granted.   Add a new user and grant some authorities then drop the user Now recheck the authorities still the user is defined in database and the authorities are there. In most cases this will not be an issue practically as default authentication can not happen since the user is dropped from OS level. Anyways you will have to revoke the authorities manually if you want to remove them. And if you ever needed to remove this type of entries from database (Happened to me.. Didn’t work saying “it will not affect anything L ”) below script will find those users and any objects that they have the ownership. On UNIX, DB2 => 9 . ~/.profile cat /etc/passwd | awk 'BEGIN { FS = ":" } ; { prin

DB2 Resolve SQL2062N An error occurred while accessing media

We were trying to restore a TSM backup of SAP with load options of DB2 restore. Command – db2 backup db ecp online load /usr/tivoli/tsm/tdp_r3/db264/libtdpdb264.a But we were repeatedly getting SQL2062N, SQL2062N An error occurred while accessing media "/usr/tivoli/tsm/tdp_r3/db264/libtdpdb264.a". Reason code: "11". dsmerror.log or db2diag log was not helping much. Then we were looking at - tdpdb2.<SID>.<nodename>.log ( http://publib.boulder.ibm.com/infocenter/tsminfo/v6/index.jsp?topic=%2Fcom.ibm.itsm.erp.doc%2Fr_dperp_d_prob_reasoncodes.html ) From that we could find the reason… It was because the ‘XINT_PROFILE’ environment variable was not set.. How to set XINT_PROFILE is described clearly in here, http://www-01.ibm.com/support/docview.wss?uid=swg21250331

Restore RMAN full backup on different server skiping set of tablespaces

This is a 10 step guide on restoring/recovering a set tablespaces on different server from RMAN full backup. OS – RHEL -4 DB - 10.2.0.4.0 Step 1 – Start from dummy parameter file RMAN> startup force Step 2 – Restore spfile from backup set RMAN> restore spfile from '<FULL_PATH_TO_BACKUP_PIECE>'; Here you can find the backup piece containing parameter file by looking at the backup log or simply it is the smallest backup piece in backupset. Step 3 – Create pfile from spfile and do the required changes SQL> create pfile from spfile; After creating the pfile you can edit the settings of parameters so that it   would   suite the new server. Most of these parameter values are PATHs that need to be changed according to new server Oracle Home. 1.audit_file_dest 2.background_dump_dest 3.control_files 4.core_dump_dest 5.log_archive_dest_1 6.user_dump_dest Step 4 – Create spfile from pfile, Shut Down, Startup Nomount SQL>

Oracle DB2 Database Howto

What is This...? Hi All, Here I am planning to post step by step "how to"s and workarounds related to various issues we have faced while working with DB2/Oracle. You are welcome to comment, correct on each and every post. Thank You